Documentation
Open Source Release Policy
Export Compliance
Using BouncyCastle
Installing the API
Enabling Logging
Per-Connection Logging
Third Party Dependencies
Generating SSH Keys
Using BouncyCastle
Using SSH Public Keys in Java
Supporting ED25519/Curve25519
Supporting Compression
Integrating Licensing into Maven Builds
Creating an SSH Client
Public Key Authentication
Keyboard Interactive Authentication
Public Key Authentication with sshagent
Executing Single Commands
Executing Commands within a Shell
Transferring Files
Connecting through Proxies
Display the Authentication Banner
Using the SFTP Client
Port Forwarding
Working Examples
Configuring Listening Interfaces
Configuring Host Keys
Password Authentication
Public Key Authentication
Challenge-Response Authentication
Configuring Port Forwarding
Configuring SFTP
Supporting SCP
Implementing your own File System
Creating an Interactive Terminal
Proxy Protocol Support
The minimal set of maven dependencies required are:
<dependency>
	<groupId>com.sshtools</groupId>
	<artifactId>maverick-virtual-session</artifactId>
	<version>3.1.2</version>
</dependency>
<dependency>
	<groupId>com.sshtools</groupId>
	<artifactId>maverick-synergy-server</artifactId>
	<version>3.1.2</version>
</dependency>
<dependency>
	<groupId>com.sshtools</groupId>
	<artifactId>maverick-virtual-filesystem</artifactId>
	<version>3.1.2</version>
</dependency>Code language: HTML, XML (xml)
Creating a Server
Now, let’s create the server itself with a valid user that can log in. I’ll also configure a file system that will be accessible over SFTP which I’ll demonstrate can be accessed from any custom command you create.
try(SshServer server = new SshServer(2222)) {

  server.addAuthenticator(
		new InMemoryPasswordAuthenticator()
			.addUser("admin","admin".toCharArray()));

  server.setFileFactory(new FileFactory() {
		@Override
		public AbstractFileFactory<?> getFileFactory(SshConnection con)
				throws IOException, PermissionDeniedException {
			return new VirtualFileFactory(
				new VirtualMountTemplate("/", "tmp://",
					new VFSFileFactory(), true));
		}
   });

   server.start();
   server.getShutdownFuture().waitForever();
}Code language: PHP (php)
So here we have
- Created a server listing on port 2222
- Defined the user admin that can login with the password admin
- Allocated the user a temporary home folder.
If we run this code and connect to it with the ssh command we will get the following output
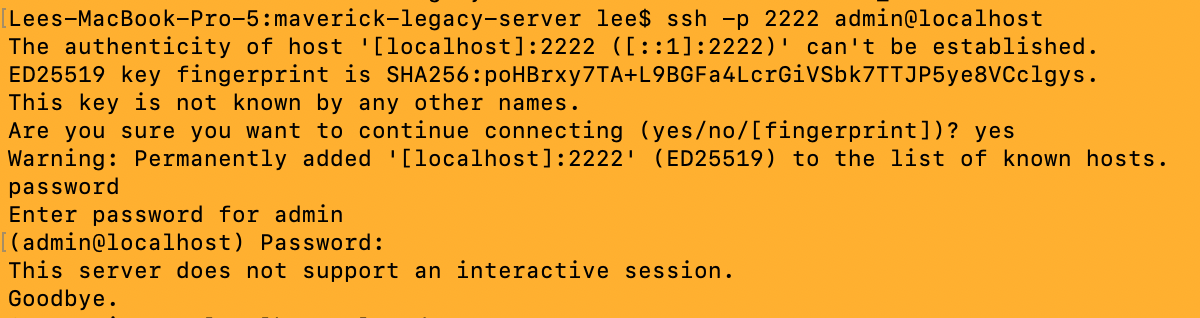
This is the default shell implementation. We can override this with our own SessionChannelNG implementation however, this would require building an interactive session from the ground up. Fortunately, we have created an interactive shell environment that makes this a lot easier.
Configure the Virtual Shell
We can add a working interactive shell with the following code. This adds a ChannelFactory that configures our VirtualShellNG session implementation. This implementation provides a framework for implementing rich interactive commands that can access the user’s file system and perform any operation you can imagine. We have a number of built-in commands you can install, for example, file system commands that perform basic ls, rm, cat etc, we have a nano implementation, and ssh and sftp commands too.
server.setChannelFactory(new VirtualChannelFactory(
		new ShellCommandFactory(
			new AdminCommandFactory(),
				new FileSystemCommandFactory())));Code language: JavaScript (javascript)
Connecting to this server now gives us an interactive shell.

In the code, we passed AdminCommandFactory and FileSystemCommandFactory. These give us some basic commands we can use. To get a full list of commands type help
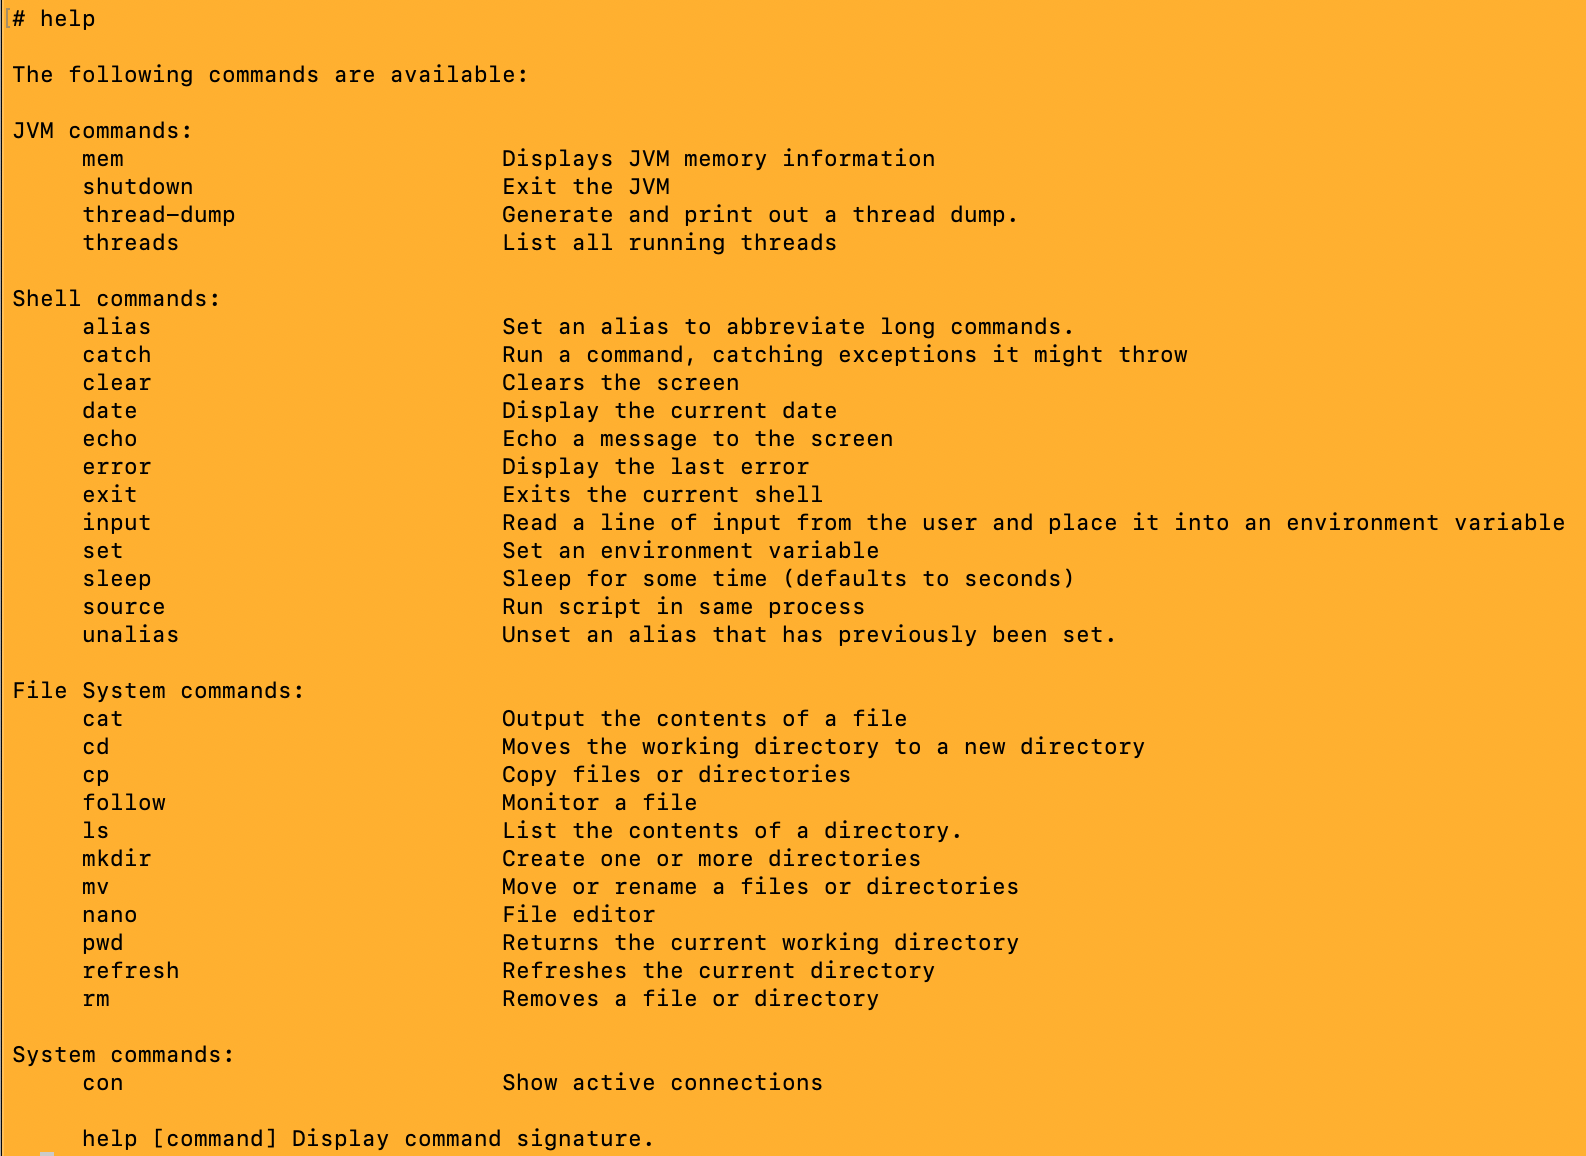
The built-in commands deserve their own mention and will be documented separately.
Creating a Custom Command
We are now ready to build our own command. Commands should extend the ShellCommand class which generally requires two tasks to implement.
Here is our fledgling implementation after creating the class with the Eclipse class wizard.
public class MyShellCommand extends ShellCommand {

	@Override
	public void run(String[] args, VirtualConsole console)
			throws IOException, PermissionDeniedException, UsageException {
		// TODO Auto-generated method stub
	}
}Code language: JavaScript (javascript)
This does not actually compile because it has no default constructor. This is the first thing you should do as all command implementations are created on-demand by their factories using a default constructor.
Let’s go ahead and add that constructor. The arguments supply basic information about the command to the shell, which it uses in the help output we have seen above.
public MyShellCommand() {
      super("my", "My Commands", "my <args>", "An example command implementation");
}Code language: JavaScript (javascript)
The first argument is the command name, this is the value the user has to type to invoke the command.
The second argument is the command subsystem. If you refer back to the help output you will see commands are separated by subsystem. This can be any value you want, but we suggest you keep this consistent to group your commands together in the help output.
The third argument is the help signature. This is output when the user types the command help my.
Finally is the description which is included in the help command output.
Implementing the Command
When the virtual shell executes a command it creates an instance of the class and calls its run method and passes any arguments supplied by the user. It also passes a copy of the VirtualConsole class which you can use to interact with the user or the shell environment.
For example, you can print to the terminal:
console.println("This is the output of my command");Code language: JavaScript (javascript)Or you can receive input:
String val = console.readLine("Provide some input: ");Code language: JavaScript (javascript)You can also interact with the file system configured at the server level for this user. Simply get the user’s AbstractFileFactory from the VirtualConsole object and use it to query the file system.
// Get the default path which will be the users home directory.
AbstractFile file = console.getFileFactory().getDefaultPath();
console.println("Home is " + file.getAbsolutePath());Code language: JavaScript (javascript)
Installing the Command
The final operation to get your command working in the virtual shell is to install the command in the server. To do this create your own extension of ShellCommandFactory and install the command in its constructor.
public class MyShellCommandFactory extends ShellCommandFactory {
	public MyShellCommandFactory() {
		installCommand(MyShellCommand.class);
	}
}Code language: PHP (php)
Then add this to the VirtualChannelFactory configuration in your server code
server.setChannelFactory(new VirtualChannelFactory(
	new ShellCommandFactory(new AdminCommandFactory(),
               new FileSystemCommandFactory(),
		     new MyShellCommandFactory())));Code language: JavaScript (javascript)
And now you should have enough information to implement your own commands.
There are some advanced topics to discuss in future documentation, such as supporting argument completion when the user is typing a command, the ShellCommandWithOptions class provides a way to build up complex command-line switches using Apache Commons CLI, creating programs like sftp or mysql that run a set of their own commands within their own mini shell, or bypassing the pseudo-terminal for commands that need to speak to the remote client in a raw format, for example, scp.