Documentation
Nodal VPN
Getting Started with Nodal VPNSigning up for Nodal VPN
Deploying Nodal Agent on Proxmox
Deploying Nodal Agent on VMware ESXi
Deploying Nodal Agent on Hyper-V
Creating a VPN Network
Nodal VPN Client Configuration
Installing the Windows VPN client
Connecting the Nodal VPN Client
Setting a static IP on the Nodal Agent
Password Express
Getting Started with Password ExpressSigning up for Password Express
Installing Windows Connect
Performing a Password Reset
Configuring Authentication Policies for Password Reset
Enrolling a User
Secure File Exchange
Installing on WindowsInstalling on Linux
Installing an SSL Certificate
Uninstalling (All Platforms)
Virtual File System
Browsing Files
Sharing Files
Upload Forms
Incoming Files
Sharing Shortcodes
File Systems
Mounting External FilesLocal Files
Plan Storage
SFTP Folders
Windows Shares
S3 Buckets
Goggle Cloud Storage
Azure Containers
Server Management
Installing the Windows Credentials ProviderUser Accounts
Roles
Authorized Keys
Event Logs
Email Messages
HTML templates
Session Management
Authentication Modules
Authentication Policies
SMTP Configuration
User Interface
BrandingUser Interface Themes
Introduction
Authentication is at the heart of everything your users will do with Password Express.
This article will explain what Authentication Policies exist and how to configure them for your users.
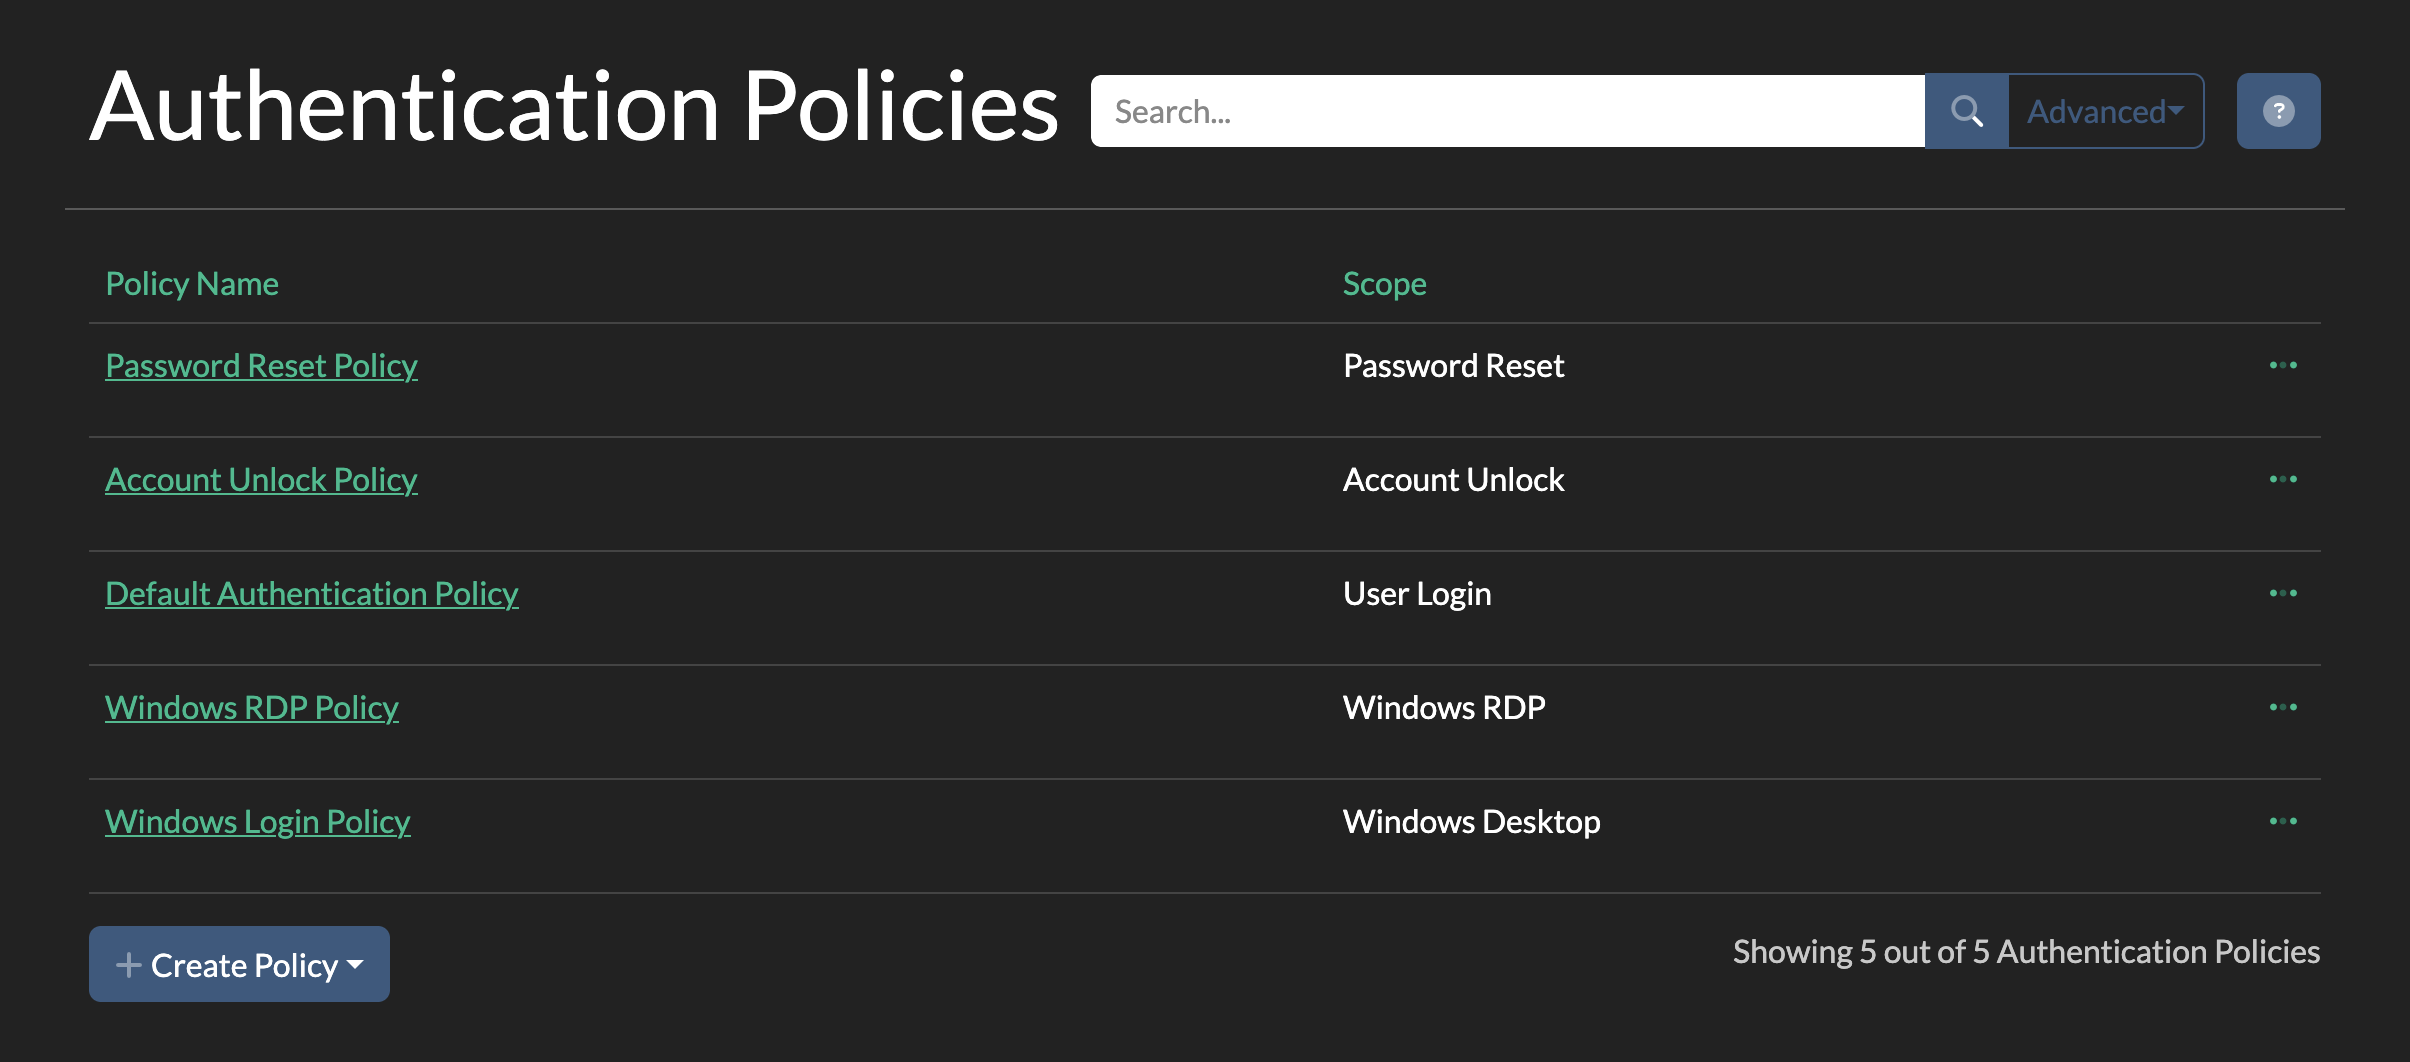
Authentication Policy types
There are 5 different Authentication Policies in Password Express.
Navigate to Security->Authentication Policies to see these.
- Default Authentication
This policy controls authenticating to the web UI.
A user would want to log in to the web UI in order to configure the credentials on their account so that they can then use them for password resets, unlocks or Windows Logins. - Password Reset
In this policy you define what authentication modules your users will use when performing a self-service password reset. - Account Unlock
In this policy you define what authentication modules your users will use when performing a self-service account unlock. - Windows Login
This policy is used in conjunction with the Desktop Credentials Provider for Windows desktop multi-factor authentication. - Windows RDP
This policy works the same as Windows Login above, but for RDP connections to remote Windows systems.
This article will cover the first 3 Authentication Policies. The last two are covered in a separate article for Windows.
Authentication Modules
Each of the Authentication Policies support any of the following authentication methods:
- Password (for the Default Authentication Policy)
- Duo Security – Uses Duo’s authenticator mobile app
- Email Authentication – sends a one-time password via email to the user
- Google Authenticator – Uses the Google Authenticator TOTP app
- LogonBox Authenticator – Uses our own authenticator app developed by us
- LogonBox TOTP – Our app also works as a TOTP provider
- Microsoft Authenticator – Uses the Microsoft Authenticator TOTP app
- Phone Authentication – Call’s the user’s mobile with an automated voice call to deliver the one-time password
- SMS Authentication – Sends a one-time password as a text message to the user’s mobile
Default Authentication Policy
The Default Authentication Policy controls access to the web UI, both for your admin account as well as your end users.
Your end users would log on to the web portal using the My Account button on the main portal, which will then prompt your users to set up any authenticators that are required for your particular configuration.
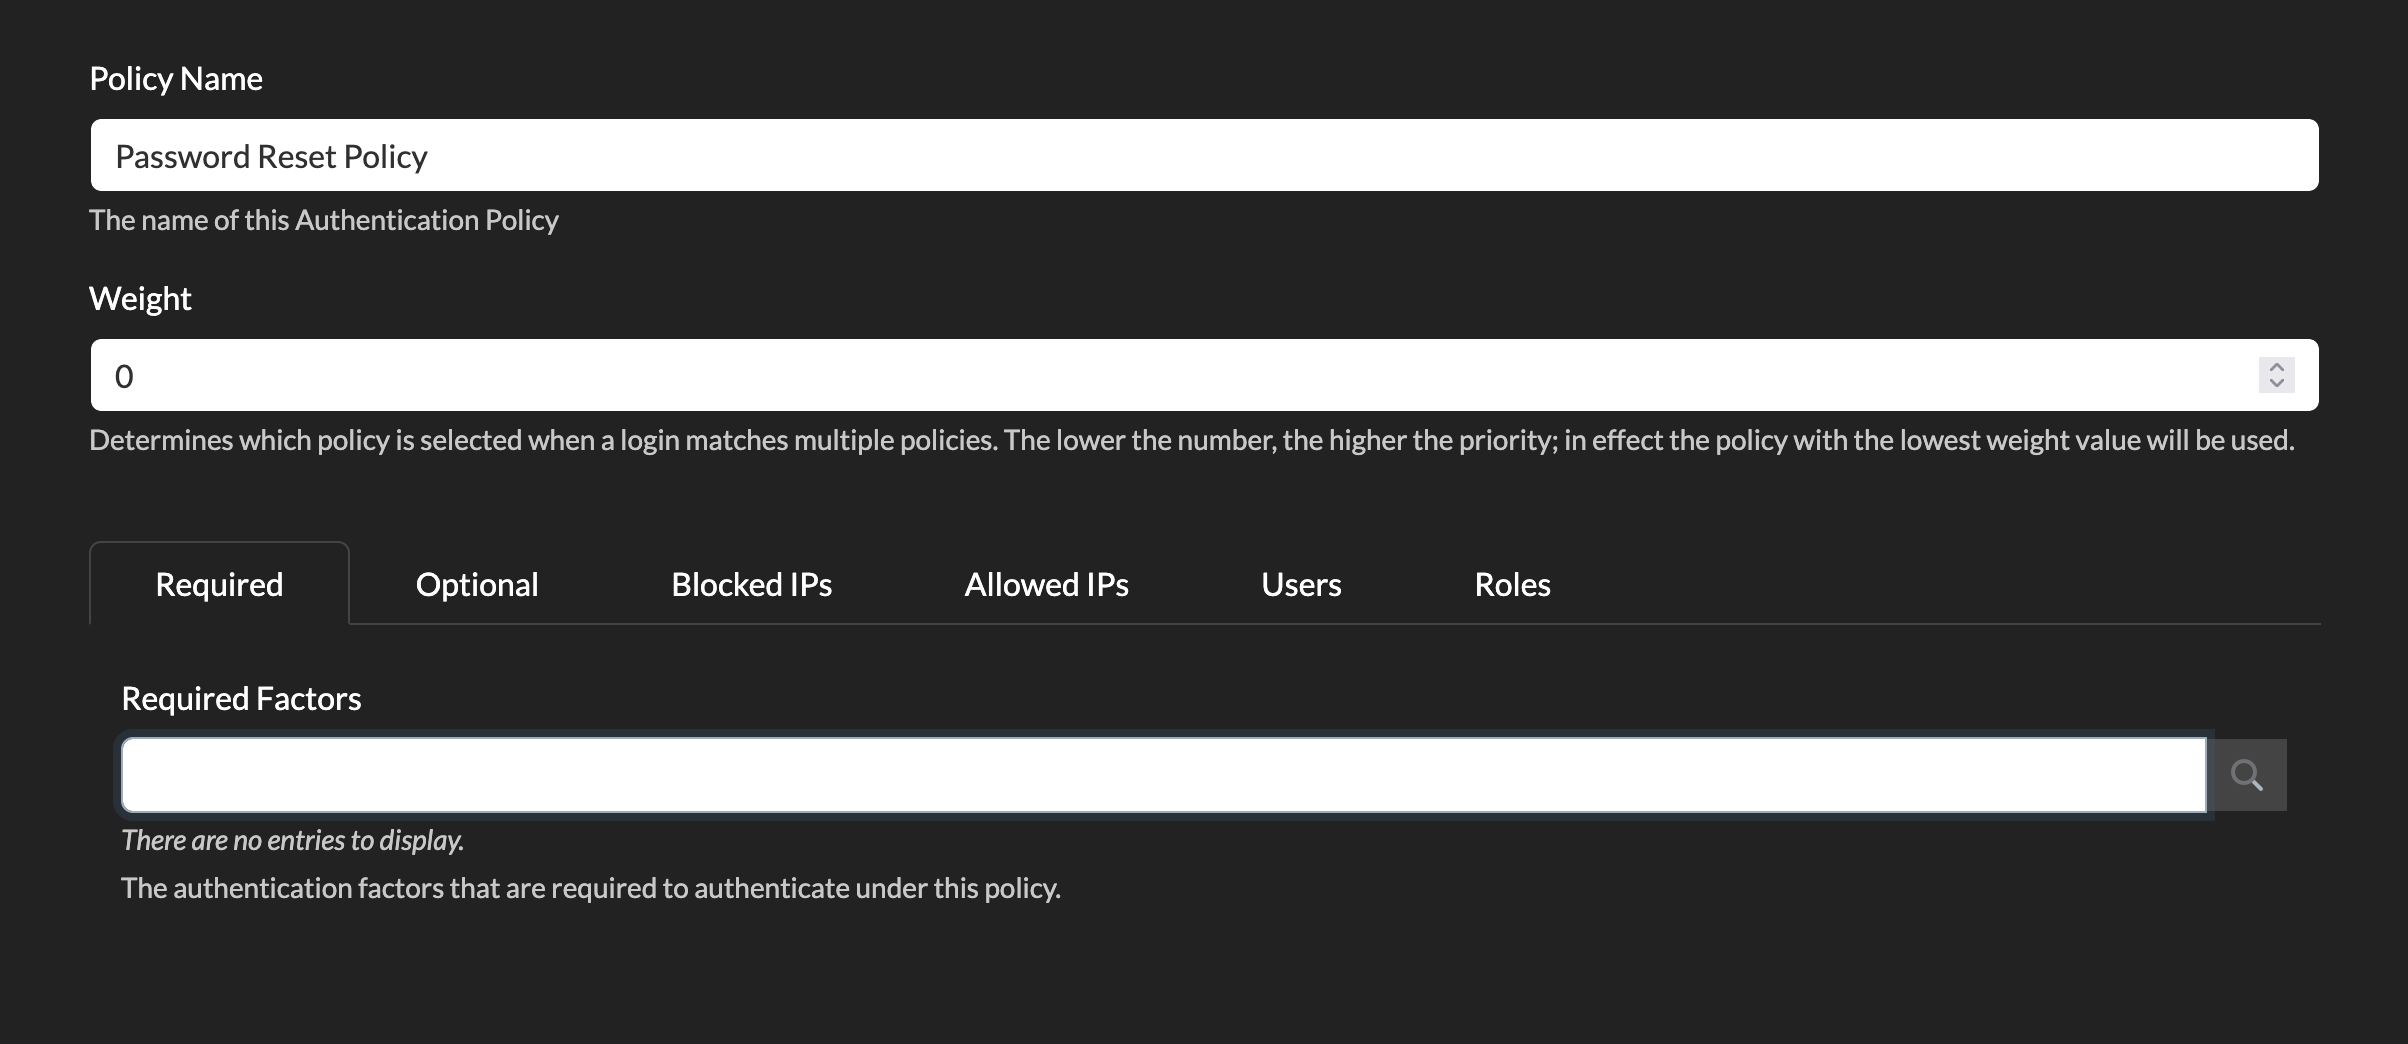
Click on the Default Authentication Policy link to edit this resource, or click on the option menu next to it and choose Edit.
You can choose to rename the policy here as well as setting a Weight.
A weight will be used if more than one authentication policy matches for a user (the lower the number, the higher the priority).

As we only have one default policy, we do not need to worry about weights for now.
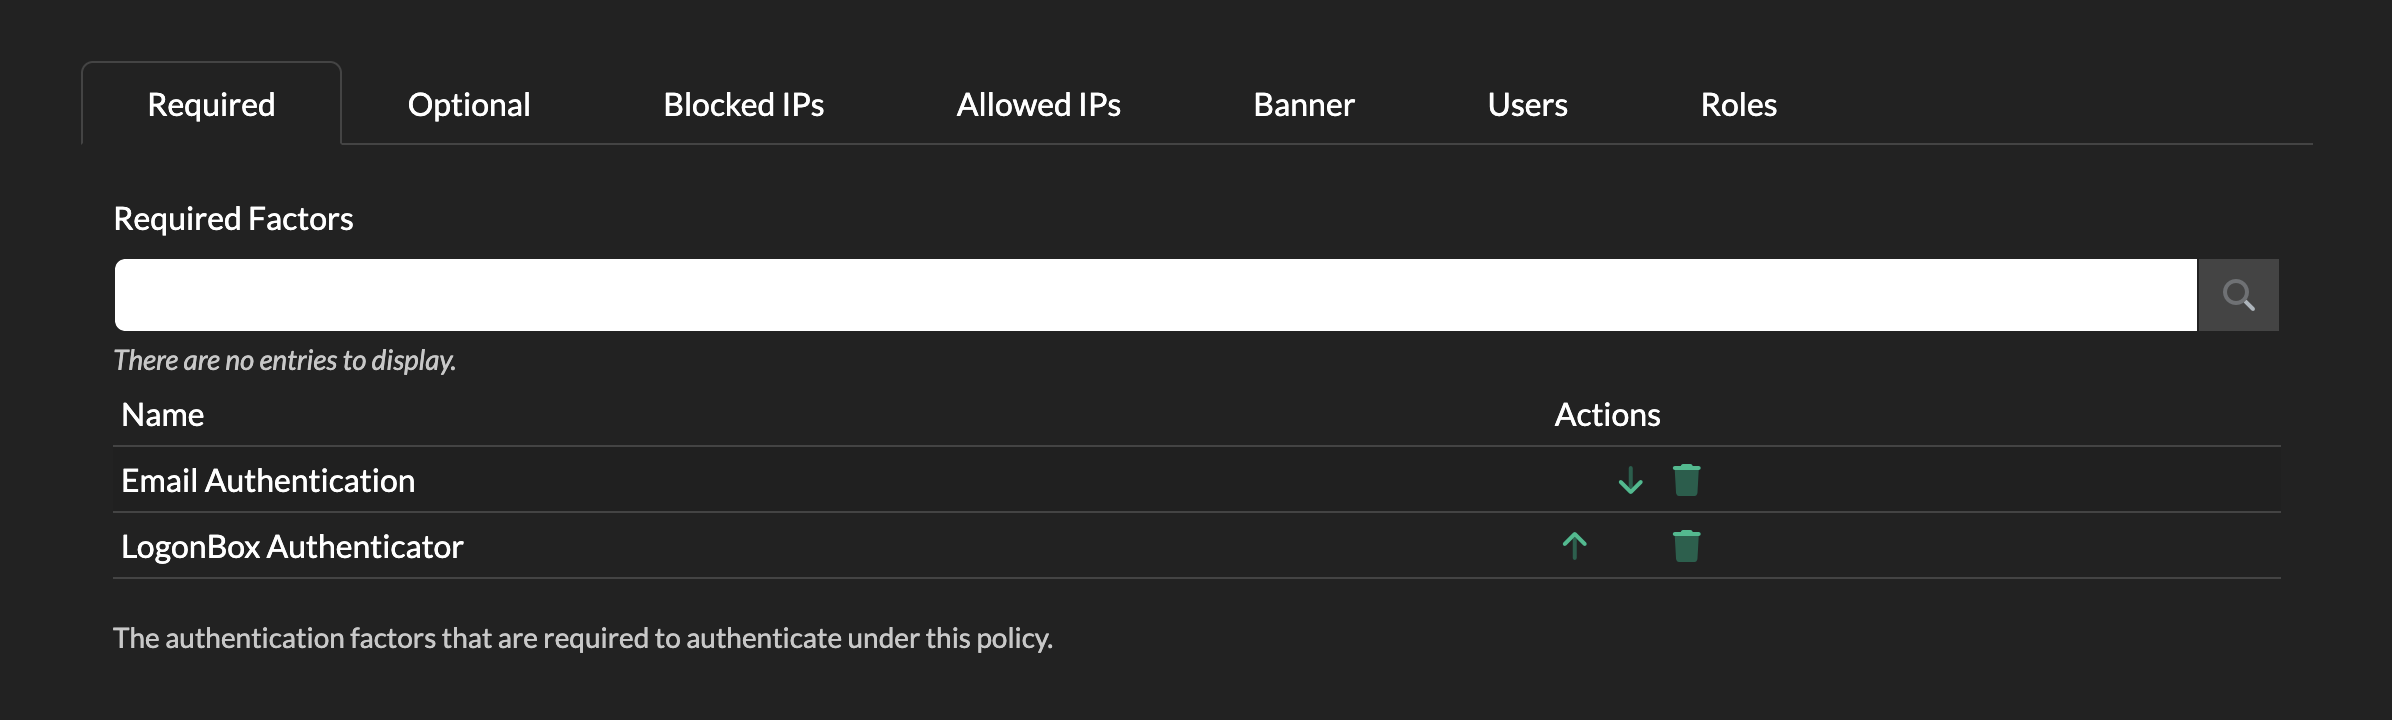
Next, we have the options for this policy, where you will see 6 tabs – Required, Optional, Blocked IPs, Allowed IPs, Users and Roles.
Required Factors
The default policy has Show Password on First Page and Password Required set, so if you want your users to just authenticate to the web with their username and password, no further action is required.
If you did not want to use the user’s directory password here or show the password on a separate page, you could turn any of these 2 options off.

If you want to add extra mandatory authentication, you can add in further modules. Click in the Required Factors text field and select the modules you require.
More than one can be added. If you have more than one, then the order can be changed by clicking the up or down arrows.
Note: The user will then be prompted for username/password followed by each defined module in this order.
Optional Factors
If you prefer to give your users a choice of which authentication to use, you can configure the Optional tab instead.
Add in the authentication modules you want to make available in the Optional Factors text entry, by clicking it and selecting from the dropdown.
Now set a value for Minimum Factors to set how many of these authentications must be passed by the user.
In this example, we have provided a list of 3 modules and a user must authenticate with any 2 of them.
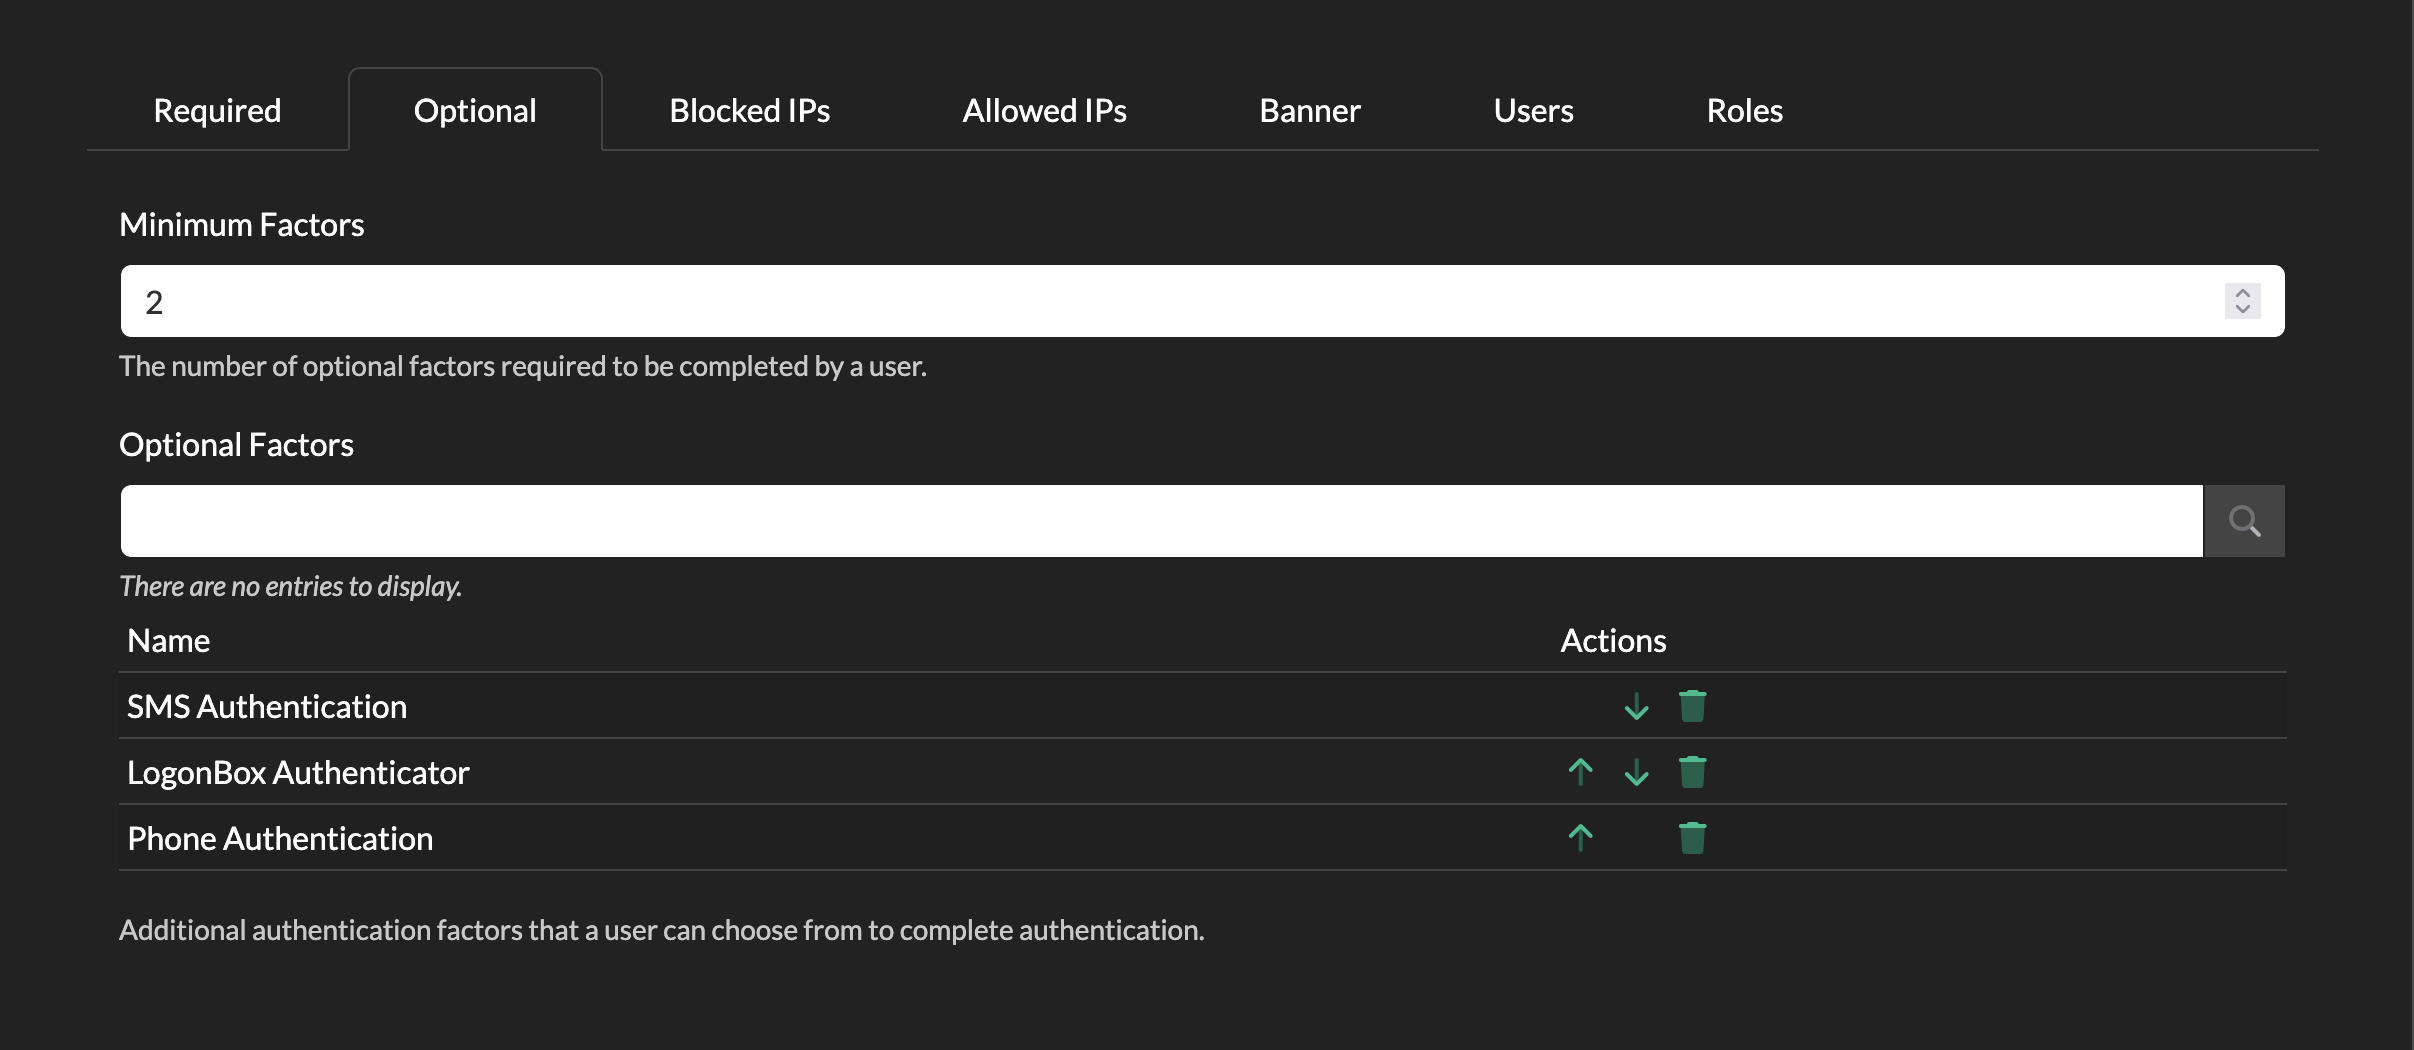
You can combine Required with Optional if you have more complex authentication needs.
Blocked IPs
Authentications can be further locked down by defining a blocked IP list.
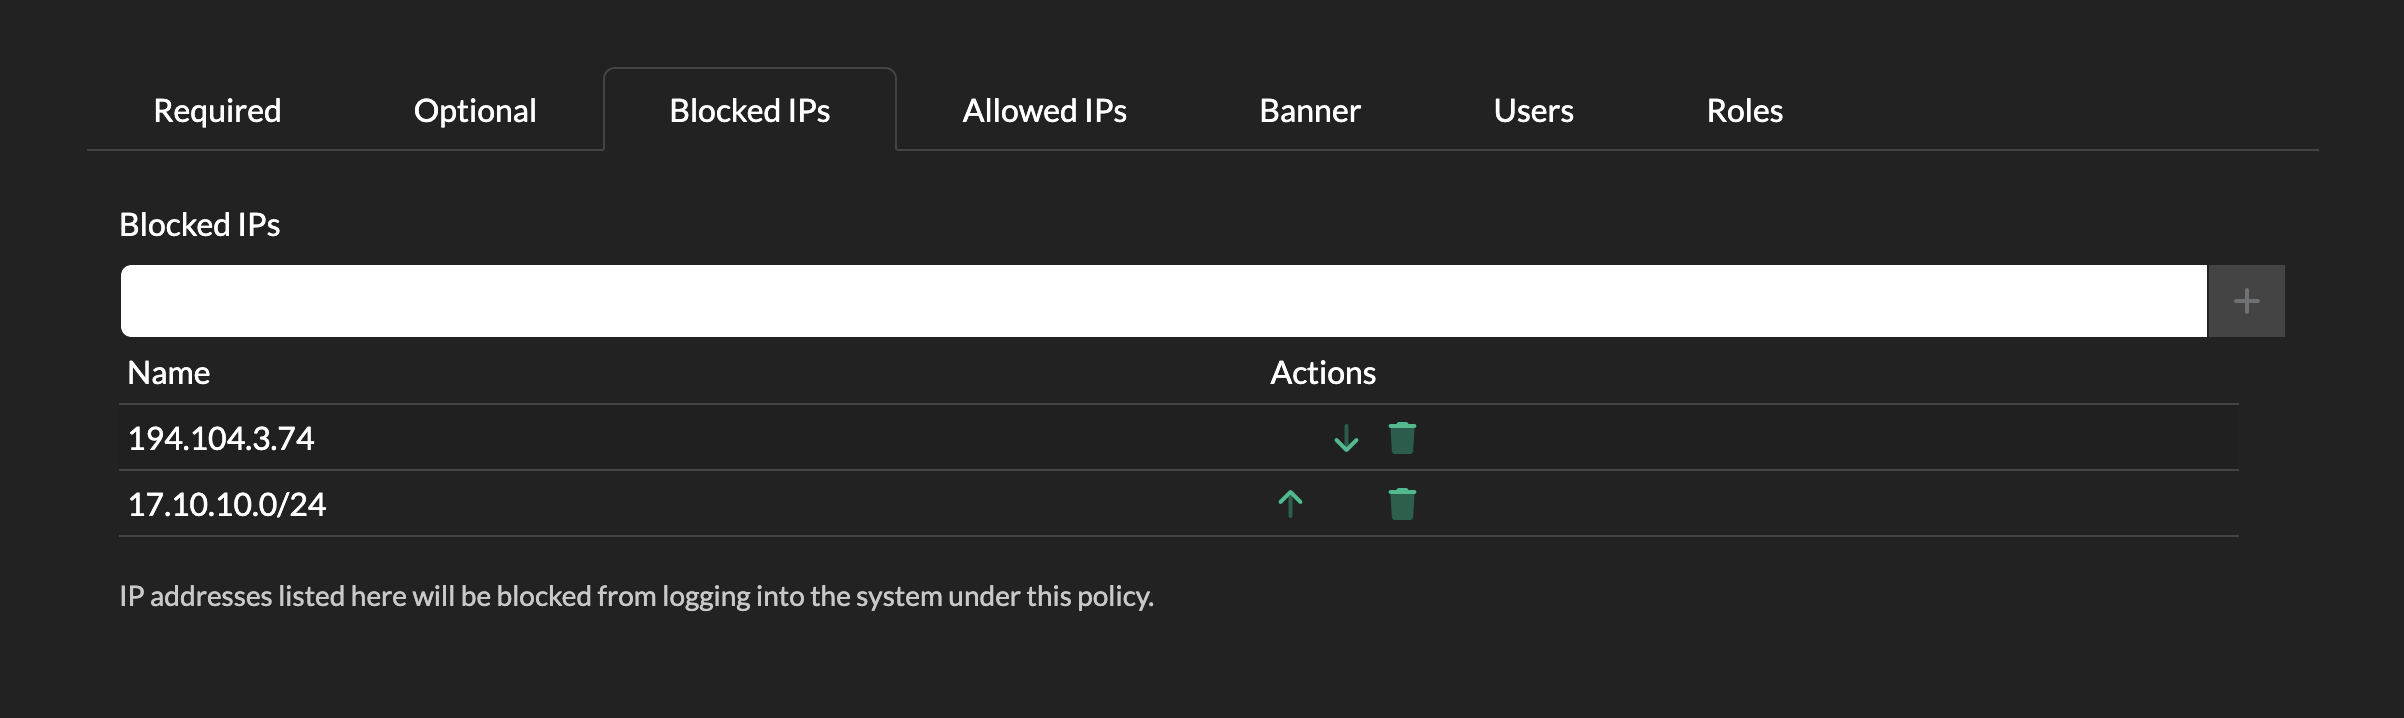
In the Blocked IPs tab, click on Blocked IPs and type in any IP address or CIDR range you wish to block.
Any user with a source IP address that matches this list will be blocked from authenticating to the tenant.
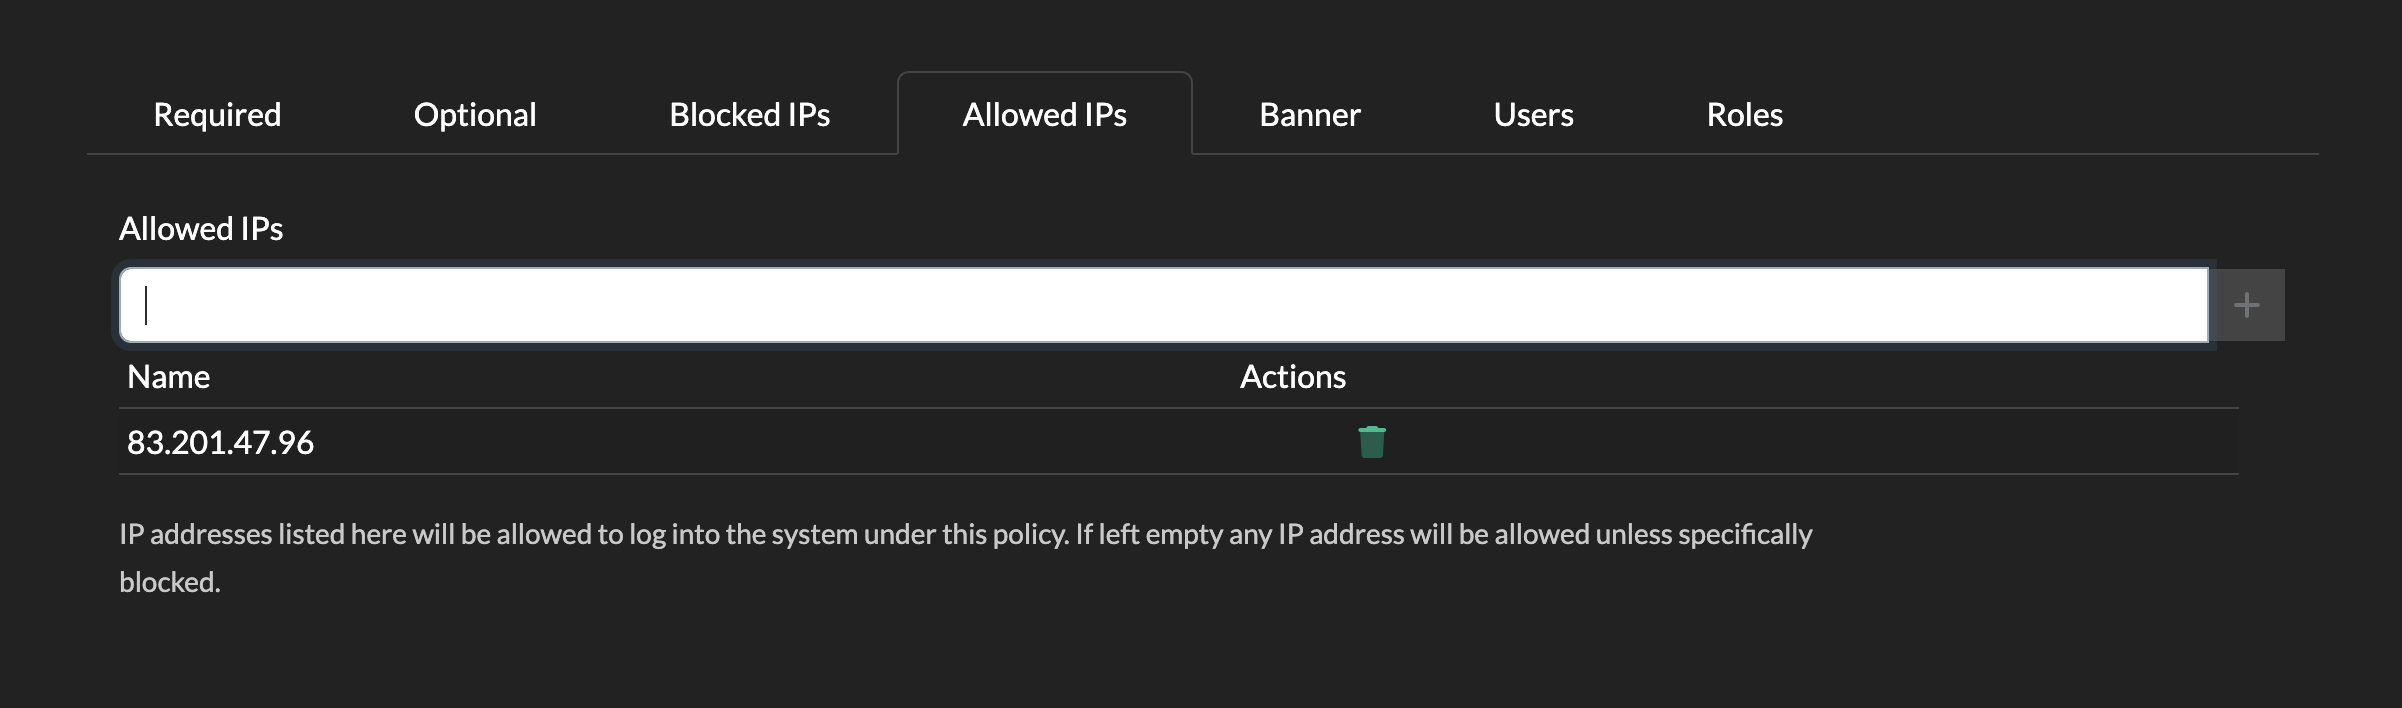
Allowed IPs
Conversely, you can choose instead to only allow a set of IPs. You can add IPs or CIDR ranges as per Blocked IPs above.
If you add any IPs here, then users will only be able to log in if their source IP matches this list.
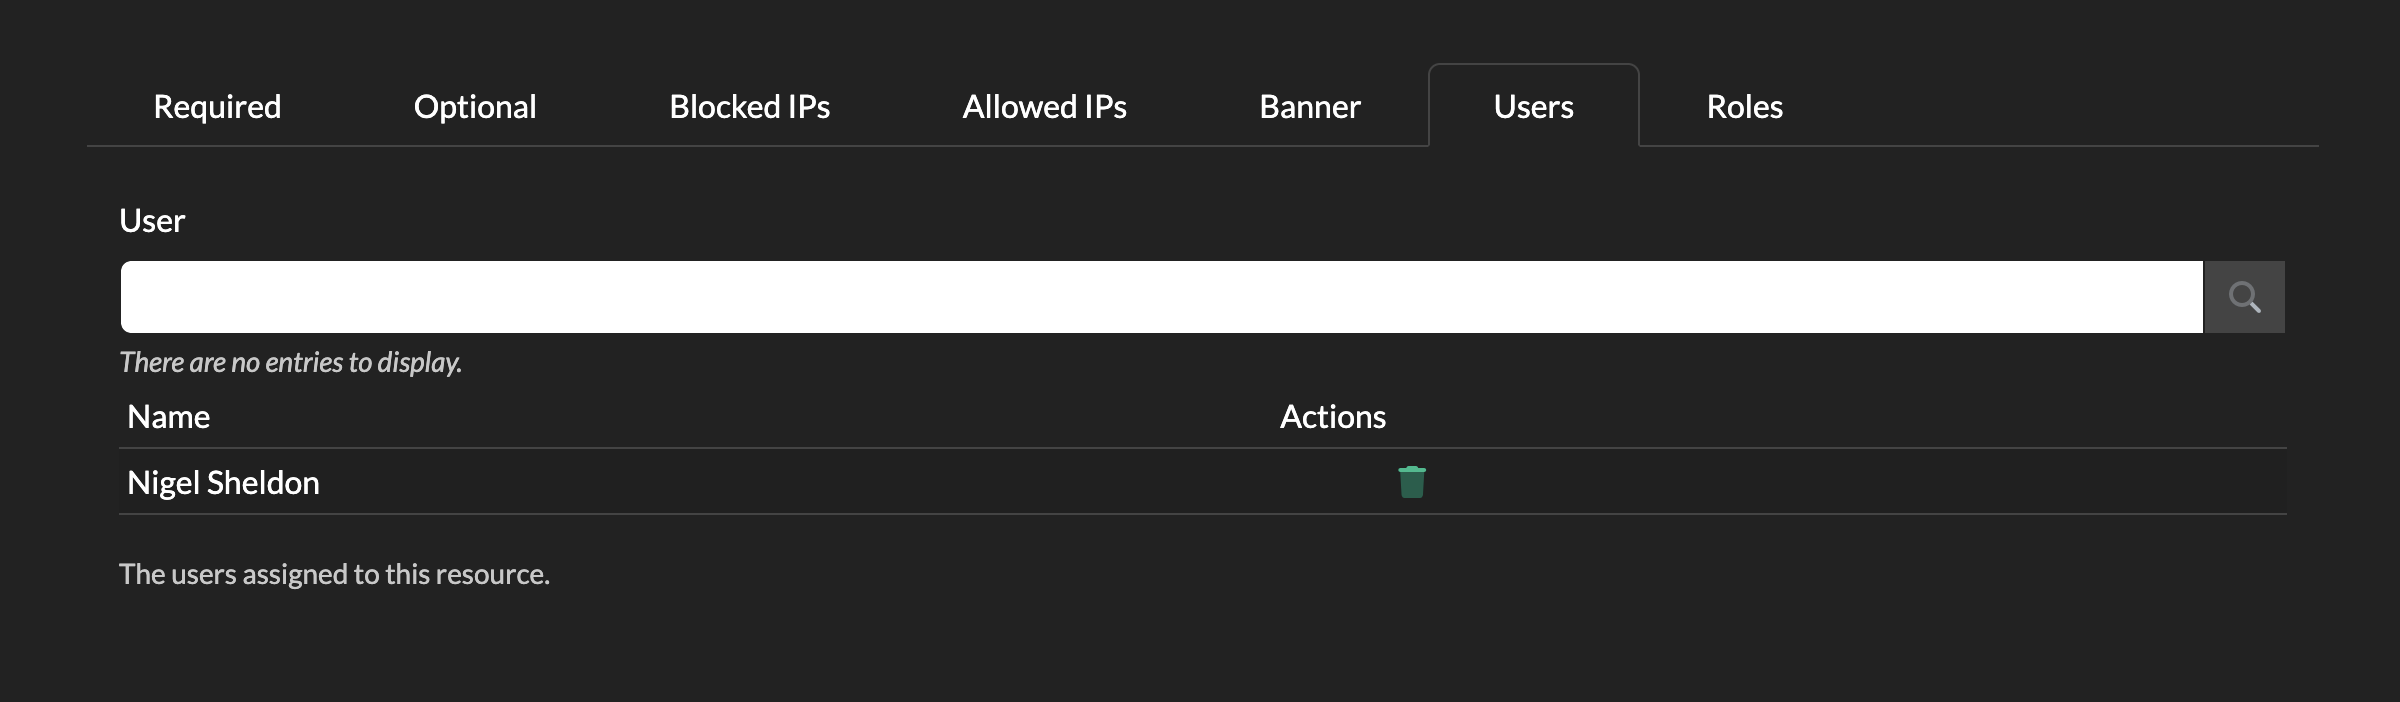
Users
You can choose to apply this Authentication Policy to a defined set of users.
If the Users tab is left blank, this means that all users that you have configured via Security->Windows Domain will be able to use this policy.
Assigning to specific users can be useful if you wish to have different authentication methods for different groups of users (in which case you would assign this default policy to some users, then create a new User Login policy on the main Policies page, add different authentication and assign to a different set of users).
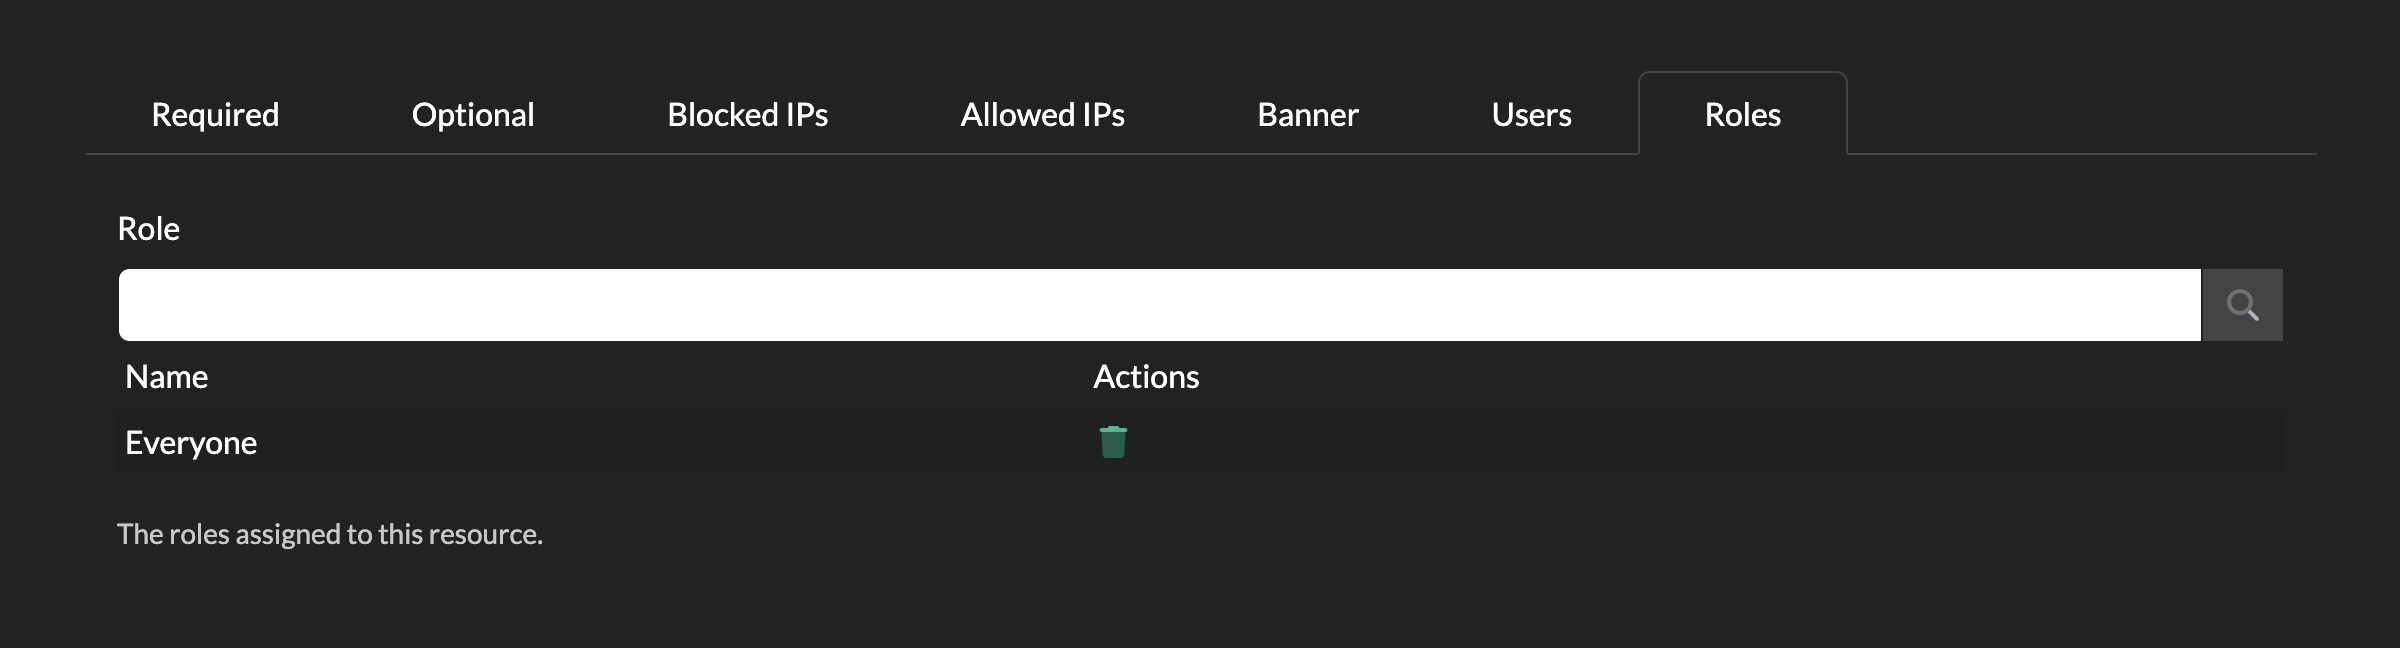
Roles
As with the User tab above, you can also assign a policy to Roles.
Roles can be found in Security->Roles and for the purposes of authentication you can consider them to be the same as a Group, but one where you can define members within Password Express.
You would create a new Role, add in any number of users you wanted, then assign this Role in your policy.
By default this is assigned to a built-in Role called Everyone, which contains all users.
Password Reset Policy
The same tabs covered above with Default Authentication Policy can be used in the same way in the Password Reset Policy, with the exception of Password Authentication.
Any authentication modules you add here will be applied for users performing self-service password resets.
Users would access the password reset flow by clicking Forgot your Password? from the main portal.
Account Unlock Policy
The same tabs covered above with Default Authentication Policy can be used in the same way in Account Unlock Policy, with the exception of Password Authentication.
Any authentication modules you add here will be applied for users performing self-service account unlocks.
Users would access the password reset flow by clicking Locked your Account? from the main portal.
Once you have your Authentication Policies configure, you are ready to start testing with your users.